

Forum Replies Created
-
AuthorPosts
-
Discoverie
ParticipantChuck,
Setting up the keel so that it can be blocked anywhere sounds good. How is that accomplished? Does one partly fill in the lower bilge?Tkx,
RogerParticipantRelated question. I’m looking for a whisker pole for my 424 cutter. What is a reasonably safe diameter and length?Roger
ParticipantResults from Discoverie in line:
�I ran the boat at 2200 RPM for an hour and achieved these results:�Cockpit gauge reading: 190-205 degreesDiscoverie: 180 continuous
Thermostat housing surface reading (with infrared heat detector): 197-203 degreesDiscoverie: 132 (didnât believe this a first, but took six consistent readings)
Heat exchanger, cool end: 118-130 degreesDiscoverie: 107
Heat exchanger, hot end: 170-200 degreesDiscoverie: 175
Galvanized exhaust pipe (between extruded exhaust manifold and exhaust elbow): 360-380 degreesDiscoverie: 255
Extruded exhaust manifold surface temp: 170-180 degreesAlso noted on Discoverie
Engine Head temp: 177Radiator cap: 162Oil cooler: 172�Conditions were:OAT: 92 degreesDiscoverie: 78
Water temp: About 83 degreesDiscoverie: 76
Humidity: 72 percentDiscoverie: not sure but highish
�Performance achieved:SOG: 6.7 knots with a 7 knot head wind. 7.6 knots on a reciprocal headingDiscoverie: 6.1 knots with 8 knot head wind
Engine cover top off, but cowling on
To me the most interesting thing about this is the consistency of the metrics between the hot and cooler engine. But to the point and focusing on the heat exchanger, both are cooling by about 70 degrees. Given that this is a primary cooling device for the engine temp Iâd look at the heat exchanger. It may be that a partially limed-up heat exchanger is blocked from removing heat at lower temperatures and gets more efficent at higher temperatures. Essentially setting the temperature at 200 degrees vs 180.
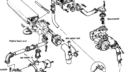
ParticipantExcellent data youâve collected. Iâll try to do same this weekend and post.Question: when you measured the temp around the engine, was the engine cover partially in place or fully open?On a temporary solution for disabling the buzzer. The simplest solution would be to get a switch at the end of a pair of wires and put this in series with the buzzer. you could put the switch somewhere handy, perhaps run the pair of wires up through a lazaret. For something with less of a potential trip hazard, and if youâre hardly with circuits, you could wire up a delay switch that opens for a fixed period of time before closing. Iâm thinking of something with a trickle charge to a capacitor and a relay would do the trick. Best solution, of course, is to identify the cause of overheating.For reference, I pasted the freshwater cooling system diagram from the owners manual belowrbAttachments:
5362264388704942280.png
ParticipantDiscoverie’s W58 had (mostly) the original pumps and heat exchangers. When I had coolant leakage problem I decide to replace all but the transmission cooler as it was newish. I agree that the primary heat exchanger is you most likely culprit. Given the age, you might consider replacement. http://lencocoolers.com was the source for mine. If you do order one be sure to document all the connections positions. I ordered mine initially based on the Westebeke parts catalog. But the configuration of the heat exchanger in my ’83 boat was different. Lenco was great. They took back that part and fabricated the correct part at no initial charge. I think the new heat exchanger cost $325. (Shout out to Bob Fine here for suggesting Lenco and doing the heavy lifting on this effort).But your situation caused me to think a bit. Now that I have a new cooling system, I should record the operating temp at various points in the system. With a IR thermometer a baseline could the documented for future reference. For example, as a heat exchanger gets gradually blocked, the return hose should show an increase from the baseline as less heat is removed.I’m curious to know what the temp is for your return hose. I’ll measure mine and air temp and the humidity. Comparing these could be interesting.RogerAttachments:
ParticipantI like this method. Still wondering why Pearson didn’t bolt the seacocks through the hull. Is that not considered the “proper” way to install seacocks?Roger
Attachments:
ParticipantI second that notionâmake or buy solid backing blocks. With luck the new sea cocks will be in place a long time. Also, if possible, use really good fasteners. My thought was that silicon bronze was the most durable; so I used those.
rb
ParticipantStill recommending the thin-edged grinding blade. If you are careful, you might avoid doing glass work. I think the sawzall will be harder to control–albeit more fun to operate.Remember eye protection, if you go with the grinder. Let us know how it goes.Roger
Attachments:
ParticipantYikes! that is scary.
Mine were all screwed in with an inch or more of thread, but the mountings were so rotten it was no more than the mushrooms holding them in place.rb
ParticipantYes you’ve got the right idea about removing the exposed mushroom. Here’s how I did them.Use a grinder with a thin cutting blade and cut 3 or 4 slices through the thru hull mushroom. These cuts should be across the diameter of the mushroom, with the grinder blade perpendicular to hull. (Be sure to were solid eye or face protection, gloves, protect your neck, etc and wear a hard hat during this as breaking blades is very possible). When you have a star pattern cut, the mushroom will be a collection of wedges. The take a cold chisel and pound thru wedges out by hammering the outside edge of a wedge toward the pointy end of wedge. They break off easily after you get the first one out. If you boat is like mine the fasteners and base plate will be rotten and once the mushroom exterior is removed you can use a hammer and a piece of hardwood to knock the seacock and thru hull into the boat. On a few I had to cut nuts but most drifted out easily. On my board I cut scarfs and fiberglassed the holes. This because even when I was replacing the seacocks, I generally moved them to a more accessible location. Using this technique, you can remove several thru hull/sea cock assemblies in an hour–fiber glassing is another story.tkx,rbParticipantJust rebuilt mine this winter. Unit came out without a hitch. Could you send some pix with the problem areas highlighted? I have the contact info of two guys that worked on the original and the documentation.Roger
Attachments:
ParticipantVery much interested in this topic.One item, some have said to reinforced the stern as well.I understand that it’s important to not put hard spots into the hull when reinforcing. This means using material with similar flex characteristics as the hull. Read: use vinyl ester not epoxy. Epoxy will have a different flex and in a rough sea hard spots would create local stresses and might pull the reinforcement apart. If P424 hulls were epoxy, that would be another matter.Note: this is what I’ve read, I don’t have first hand experience in this area. Would love to hear from those with days of heavy seas experience.RogerAttachments:
ParticipantBob knows what he’s talking about. We recently removed Discoverie’s deck fittings then bored out 3/4″ holes from the bottom (hopefully leaving the deck surface intact) and epoxied the holes to fix leaks. Most of the deck core is balsa, but plywood under the staysail and a few other places.Learned a good trick for drying out the voids we made before filling with epoxy. Use a heat gun and a remote IR thermometer. With the heat gun on the temp will stay less that 200 F as it dries. Once it dries, the temp starts to rapidly rise and that one is ready to seal. Then drill and replace the fixtures with non silicone sealer.Roger
ParticipantI’ll wait for you to start the list. I’ll pull together the vendor list I mentioned for later addition.tkx,
rbParticipantSounds good. I can also add a list of I’ve found that rebuild or provide replacements. I’ll get a Google spread sheet started.
tkx,rb -
AuthorPosts
