Forum Replies Created
-
AuthorPosts
-
September 19, 2016 at 1:35 pm in reply to: Prop Strut casting – anyone have a place to purchase? #221580
Chuck Ruble
ParticipantRob, Buck Algonquin is the best source for a new strut. I don’t have the specifications for our strut. The easiest method would be to send them the old one. They’ll create a sand cast from it and make a new one if they don’t have it already available as a cast.
I would expect it should be between $500 and $900 for a new strut. You’ll need a new cutless.
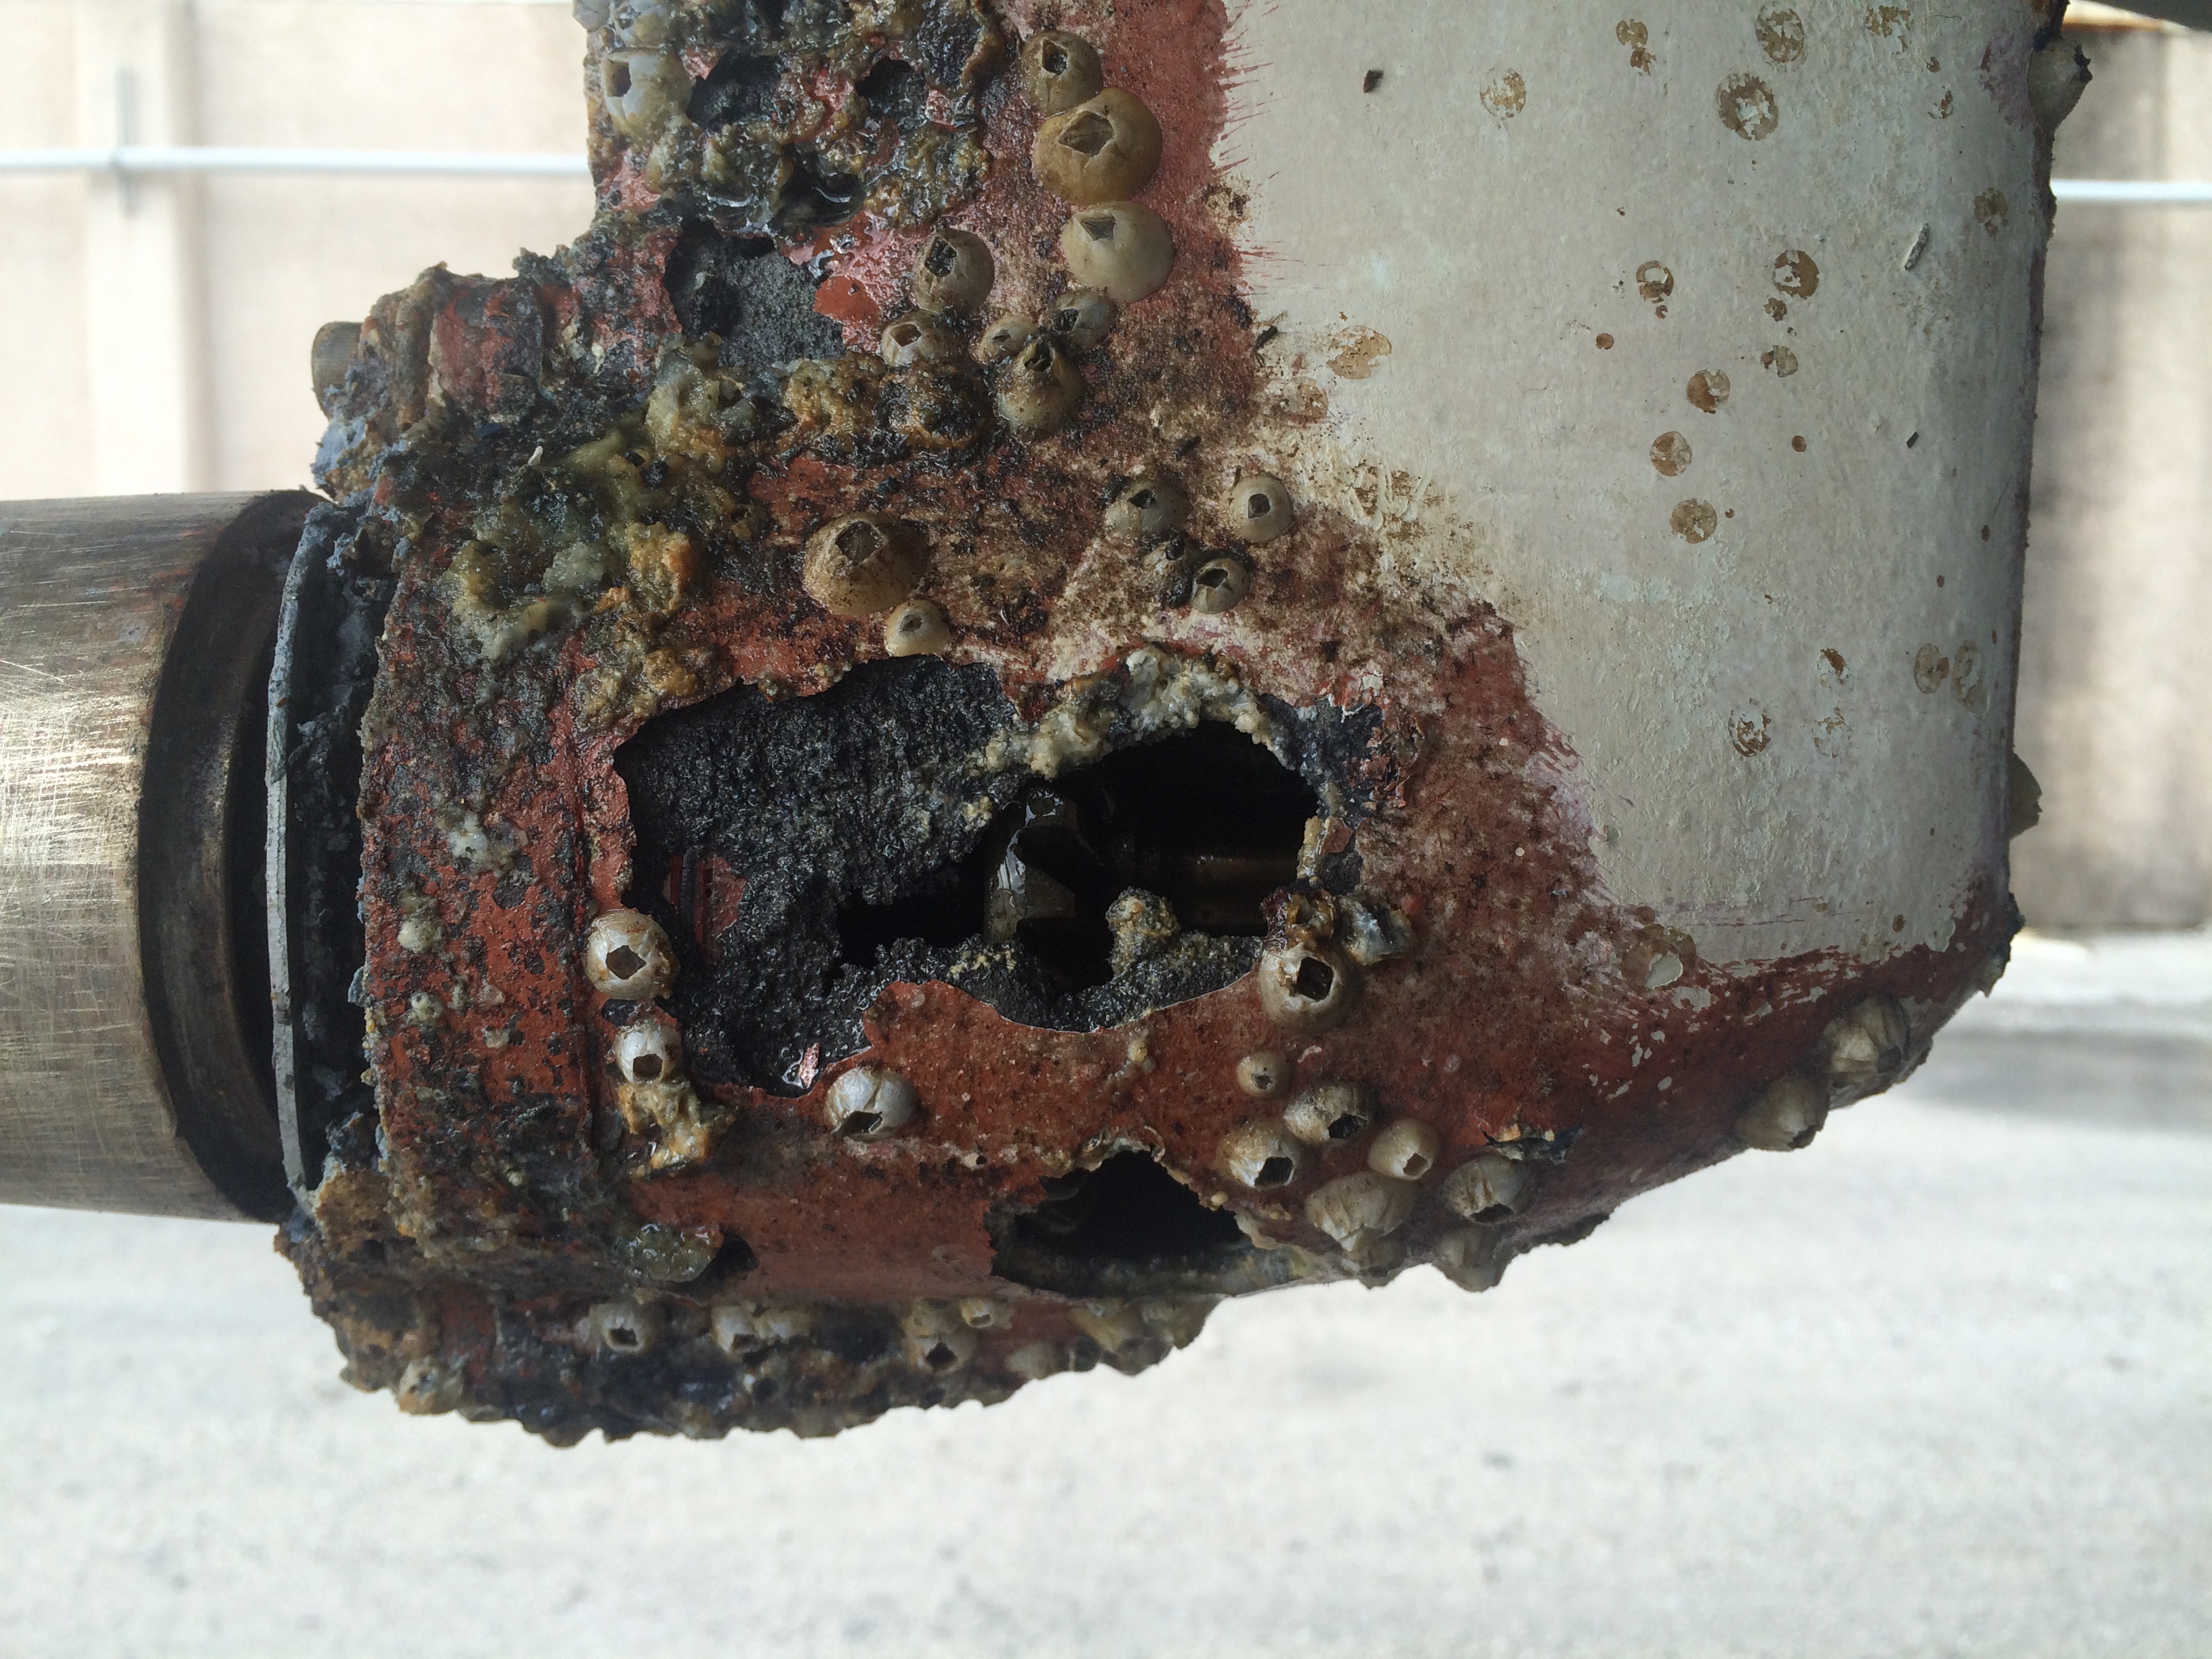
It’s possible the bonding wire to the fixture had a corroded terminal causing higher resistance on the circuit. I see this sometimes when we see halo’s around thru-hulls too. I’m not sure why these and props get pink faster than a thru-hull. I’d guess the metallurgy is different as it has more of itself to support vs a compact fixture like a mushroom.
I’m not a galvanic corrosion expert. I clean up after the incidents and do the best to keep if from happening again by looking for issues that could be the source of the problem.
The photo is probably the worst case I’ve ever seen. Both drives suffered the same fate.
Chuck
Attachments:
IMG_2852.jpg
ParticipantBead Game, where is the crack? It isn’t evident in the photos you posted.
As for why its cracked isn’t so important. It’s cracked, needs fixed.
Open the photos in mspaint and add some arrows to show where the crack is.A key (if not first)component in the design of the boat is the keel. A keel should accommodate blocking at any location. You want to fix this right. Having a keel that can only be blocked in certain locations is another fix waiting to happen.
I did a major repair to mine, if its in the same spot I can give you some tips on fixing it. If you search keel repair there lots in here including my posts. The photos may no longer as the links are stale. I can repost them if needed.
Chuck
ParticipantQuent, you are correct. The engine however doesn’t have any concern how fast the prop shaft is turning. The number being displayed on the tachometer is the crankshaft rotations and is not directly modified by gearing changes. Overload the engine by whatever means (poor gear selection, wrapping a crab pot around the shaft, etc) and you can slow down the engine but your simply binding it up with resistance.
The engine wants to turn in the rpm range in which is was designed to operate. The engine at wide open throttle should be able to turn at its max rated rpm (in this cases 3200 rpm) and reach a nominal speed, on the 424 around 8 knots. If its running slower than that then it is probably under propped.
What you don’t want to do is set it up so that its running at 8 knots at 2200 rpms. This will overload the engine (using said resistance) and ensure a premature demise.
Set up correctly she should make around 6.5 knots at roughly 2500 rpms which is 80% of max and is where the power plant is designed to run.
Rob’s 80 is turbo charged and it’s especially important that it be run at load.
The death of these engines is being run to lightly and run too seldom.Hope this helps.
ParticipantRob, the faster turning engine will require less prop. The engine should be able to obtain its max rated rpms under way if the prop is set up correctly. All your changes made to the propulsion system, gearing etc. will determine what the prop pitch ends up being. A larger diameter blade would be a bigger more expensive prop with less pitch than a properly sized blade with nominal pitch.
You can do all the math and come up with what you think you’ll need or finish the install put the old one on, determine what it turns and adjust from there.
Photo tach should be used, don’t rely on the tachometer.ParticipantCharlie, what you described ‘I let it sit for about 30 minutes and then when I cranked it, it ran fine’ is indicative of a fuel pick up obstruction. There’s likely something in the tank that when stirred up will block the p/u. Until the vacuum dissipates it won’t fall away. Tank interior scaling is sometimes a source, access plate sealing material (liquid gasket type) has been another common find. Sludge generally will get pulled into the tube and clogs filters. The amount of vacuum it creates is substantial.
Run the tank low in choppy waters and it may possibly re-occur.
The solenoid is pretty much go or no-go device. When it stops working it’s done. 30 minutes probably won’t change anything.ParticipantMark, we installed a 4JH57 in a Hunter this past week. It is the new common rail version of the long running 4JH series. I was really impressed with how quiet the thing is. Really quiet.
Regardless of what you get you’ll have to come up with a solution to get the exhaust output around the engine to the water lift. You’ll be upsizing the exhaust to 2.5 inches minimum depending on your selection. I chose to run mine around to the stbd side as things were really tight on the port side with the alternator being there. I went to 3 inches based on the manufactures recommendation. 2.5 probably would have been adequate.
I replaced my RV20 due to case failure long before I repowered.
The costliest part of a 424 repower is getting rid of the bottomless bathtub that Pearson put in there for a mounting surface. It was the original engine sump for the 422 (or a center cockpit version?) I’m pretty certain, look closely the next time you are in the bilge under the galley and you can see where the thing was to reside. They cut the bottom out and turned it around backwards and installed it . It was a really poor solution as everything dripping from the engine ends up in the bilge and it makes for a terrible support structure. I will say it was tenaciously affixed to the hull.
If I can find some photos of the engine beds I created I’ll post them. I created a tub that contains engine fluids. Hoses running through the sump (under the engine) aft to front allow pass through for bilge pump hoses and a drain that allows any loose water behind the engine to make its way to the bilge without touching the sump contents.
ParticipantThe valve is handy to have in the circuit provided its working correctly.
Trash in the tank will prevent it from opening/closing. There’s no way to know it’s working properly though without taking it out and applying 12 volts to it.I moved mine to an accessible spot in the engine space when I moved my Racor.
If you ever find yourself manually priming the fuel system you have to remember to set the unit to bypass otherwise you won’t get fuel past it unless you have the ignition on.
The system will siphon if you ever lose a hose at a low spot. The fuel cut off will prevent this. A manual one will also if its been closed.
ParticipantI removed and repacked the rudder tube due to the same leaking from under the interior flange. The studs that the flange is held down with are glassed into the hull. It is very important you properly clean and lube these before removing the nuts.
If the flange is in fact allowing water past it, it shouldn’t be that difficult to separate from the hull as the water has compromised the seal.
You do need to remove the rudder to do this, along with the upper support cross beam.
Careful, the rudder is heavy, the stock is solid stainless.
Not a terribly difficult job but time consuming.Chuck
ParticipantAlan, you are on the right track. A standard compression check may not reveal the problem though.
You should do a leak-down test on each cylinder. This may better determine if you have a failed head gasket and give you a good idea where to look for it when you remove the head.
The head should be dropped off at a machine shop to have it decked. Overheating can cause it to change shape.Alan (Unabated), thanks for your glowing enthusiasm shared towards all those in the marine trades industry.
Chuck
ParticipantThanks for the feedback. The other reason for putting a thin riser with the same profile as the stanchion base on the deck is after painting there won’t be any question as to where the stanchion gets mounted. This pretty much ensures the new holes I drill for the mounting hardware penetrate the epoxied rod instead of nearby deck.
I agree with the updated backing plates and eliminating the old glass ones.
Chuck
ParticipantAdam, good luck finding one of those. Its just that sort of part that drives a re-power. I passed mine onto Capt. Bill but I know his was in rough shape to start with, doubt he’d part with it.
I do have a bucket of parts that weighs in the range of 50 lbs.
It contains valve train, one or more pistons, oil pump, coolant pump, raw water pump (not sure which model), assorted brackets and who knows what else. If you are genuinely interested in it let me know. I can spread it all out and take a photo of it. You can have the contents for $100.
Shipping would probably be in the range of $75 distributed among a few boxes.Chuck
ParticipantKen, the front of mine can be removed allowing the 4 parts to be placed between the starboard settee and the salon table while I’m working on the engine.
I’m adding a second dipstick to the starboard side of the engine and putting a small access door over on that side as well so I can check the oil with out popping the lid.
I salvaged some hardware off a freight package and used them to securely hold the doghouse to the bulkhead.
I added some photos here for you to check out.
Chuck
ParticipantAqumet 22 is the product a reputable machine shop will provide. Also sold under the name Aqualoy.
Maxprop blades can be a source of vibration. Only PYI has the facility to balance these (that I am aware). Speak with Jerome when you call them. $350 plus shipping I think was the cost for the last one I sent out.
The V-drive is aligned the prop shaft coupler. Properly aligned the tolerance should be less than .003 of an inch. This also can be a source of vibration. The V-drive alignment procedure is very specific and the instructions should be followed. This is an hour of a mechanics time well invested.
A loose or improperly seated coupler can be a source of vibration. The coupler should be ‘mated’ to the shaft by the machinist making the shaft. We almost NEVER re-use the old coupler (there are exceptions).
A bent shaft can also be a source of vibration.
A worn cutless usually doesn’t create a dramatic vibration unless it is so worn that the shaft is floating in it. At this point the shaft is probably being damaged.
Having all these items checked out at once will likely eliminate an alignment issue. Seldom is there ‘one’ smoking gun. Usually it is a combination of things that over time made the problem noticeable.
ParticipantA sizable rag in the intake will shut it down very quickly if needed. Air intakes with a circular opening are easily plugged with a tennis ball. I’ve seen engine compartments with a ball secured to a string for this purpose.
Chuck
ParticipantIt’s simpler than you realize. Cut the pie piece out, I didn’t go all the way to the ballast. I just cut till I got to clean dry laminate. Realized after the fact it might have been easier. The cut from the back of the keel was around 30 inches long. About 4-6 inches up from the bottom.
Mark the cut with laser if you can. The cleaner and straighter the cut the easier the rebuild.
Create a laminate stack of solid FRP. You can purchase a 4×4 sheet of 3/8th FRP and probably have more than enough. Tab in some cross supports in the opening in the keel and some cleats on the sides/end to attach to. Make you new pie section, only has to be reasonably close.
Secure it to the bottom (screw and glue). Shape with a grinder and some 30 grit THEN wrap with glass.
I ground the profile of the keel to build it back up with the glass wrap so it didn’t bulge with the new wrap.I made a mock up of the filler piece out of wood before I started cutting up an expensive piece of FRP.
The wrap is best done with vacuum bagging. I’d leave that to a pro as it is an art that comes with practice. Set up and applying roughly 4 wraps of 1708 should take about 4 hours total, two guys to do it right, 8 labor hours. If you don’t bag it, it will sag.
You can smooth and fill it, barrier coat and paint.
Working in the bottom of the well from the inside is next to impossible. Working on the same area from outside the boat is amazingly easy.
I thought about putting a garboard plug on the side near the bottom while I was down there but decided I wasn’t that important. Probably would have been worth the effort.
Chuck
-
AuthorPosts